Flipkart

Monday, 17 September 2012

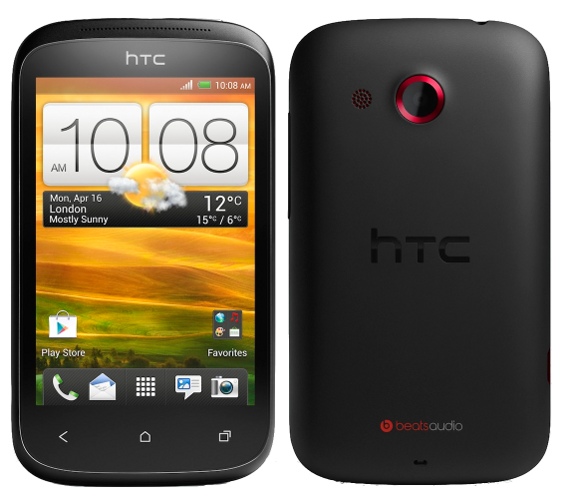
PC Mobile’s Desire C now available. Priced $150, it’s one of the cheapest Ice Cream Sandwich device


The low-end HTC Desire C is now available for purchase from PC Mobile for a price of $150 off-contract, making it one of the cheapest device to run on Android 4.0 Ice Cream Sandwich. In fact, for the 600MHz processor powering the Desire C, it runs Android 4.0 pretty well thanks to HTC’s optimization of the OS.
Here are the official specs of the HTC Desire C:
  • 600 MHz processor
  • 512MB RAM
  • 3.5″ HVGA (320×480) display
  • Android 4.0, HTC Sense UI
  • 5MP rear camera with VGA video recording
  • 4GB internal storage, up to 32GB microSD cards support
  • Wi-Fi 802.11 a/b/g/n, BT 4.0, HSPA 7.2 mbps
  • Beats Audio enhancement
  • 1230 mAh battery
The HTC Desire C is great for people on a tight budget or for people making their first move to smartphones, so make sure you consider the device when you’re out shopping for an Android device that gives you good bang for the buck.

Galaxy S3 Jelly Bean Update: I9300XXDLI8 [Android 4.1]


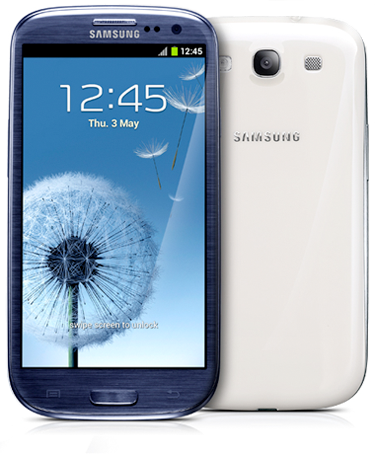
Here’s a nice Sunday treat for Galaxy S3 owners, though most probably will be irritated more than be happy, as another official Android 4.1 Jelly Bean OTA update has leaked for the Galaxy S3, this time with firmware version XXDLI8, continuing the saga of leaked updates for the device as we wait for the Jelly Bean update to be officially released (which is slated for October).
“If you have the T-Mobile Galaxy S3, you can try out its leaked Jelly Bean firmware → here. Bell Galaxy S3 (i747M) owners can try out the leaked Jelly Bean update → here. Galaxy Tab 2 10.1 Jelly Bean leak can be found → here, while Galaxy Tab 2 7.0 leak can be found → here.”
Like always, we have a guide ready that will help you flash the latest Jelly Bean update on your Galaxy S3, with step-by-step instructions. You will need to have a microSD card inserted into the phone to be able to update.
Keep in mind that this is a leaked pre-release firmware and has not yet been officially released by Samsung and hence could have some issues, so you should wait for the official update to come out if you’re not comfortable with manual flashing. But if still try it out, you can always flash back to an Android 4.0 firmware later if needed, which will enable you to get official updates from Samsung again.
Let’s take a look at how you can install XXDLI8 Jelly Bean Android 4.1 update on the Galaxy S3.
Compatibility
This guide to install Android 4.1 Jelly Bean firmware is compatible only and only with the international Galaxy S3, model number i9300It’s not compatible with the US variants or any other device. Check your device’s model number in: Settings » About phone.
Warning!
The methods and procedures discussed here are considered risky and you should not attempt anything if you don’t know completely what it is. If any damage occurs to your device, we won’t be held liable.

How to Install XXDLI8 Jelly Bean Update on Galaxy S3

  1. [Important!] You might need to wipe data during this procedure. So makes sure to backup your apps and important data — bookmarks, contacts, SMS, APNs (internet settings), etc. This Android backup guide would help you. Backup all the SD card files, including camera photos, music, etc as well as those also might get erased during the flash as this is a leaked firmware
  2. [Important!] Flash the stock XXBLG8 firmware on your phone by following the guide → here. The update will fail to flash on any other firmware or on custom ROMs, as it needs the phone to be on the XXBLG8 firmware. Keep in mind that this may require you to wipe data on your phone, so be sure to make a backup (see step 1).
  3. Download the Jelly Bean OTA update file.
    Download XXDLI8 OTA  |  Alternate Link
    Filename: GT-I9300_I9300XXDLI8-OTA-I9300XXBLG8_BTU_297718496.zip  |  Size: 283 MB
  4. Copy the GT-I9300_I9300XXDLI8-OTA-I9300XXBLG8_BTU_297718496.zip file to the external storage i.e the microSD card on your phone.
  5. Turn off the phone. Then, boot into stock recovery. To do so, hold down Volume Up, Home and then the Power buttons together until the screen turns on, then let them go. The phone will boot into recovery in a few seconds.
    In recovery, use the volume buttons to scroll up/down and the home button to select an option.
  6. Select apply update from external storage, then scroll to and select the GT-I9300_I9300XXDLI8-OTA-I9300XXBLG8_BTU_297718496.zip file to start installation of the Jelly Bean OTA update.
  7. After installation is complete, the phone should reboot automatically. If it does not reboot, go back to the main recovery menu and select reboot system now to boot up into the newly installed Android 4.1.1 Jelly Bean firmware.
The latest leaked Jelly Bean OTA update is now installed on your Galaxy S3. Do let us know how it works for you and the things you notice in the firmware (like bugs, improvements or new features).
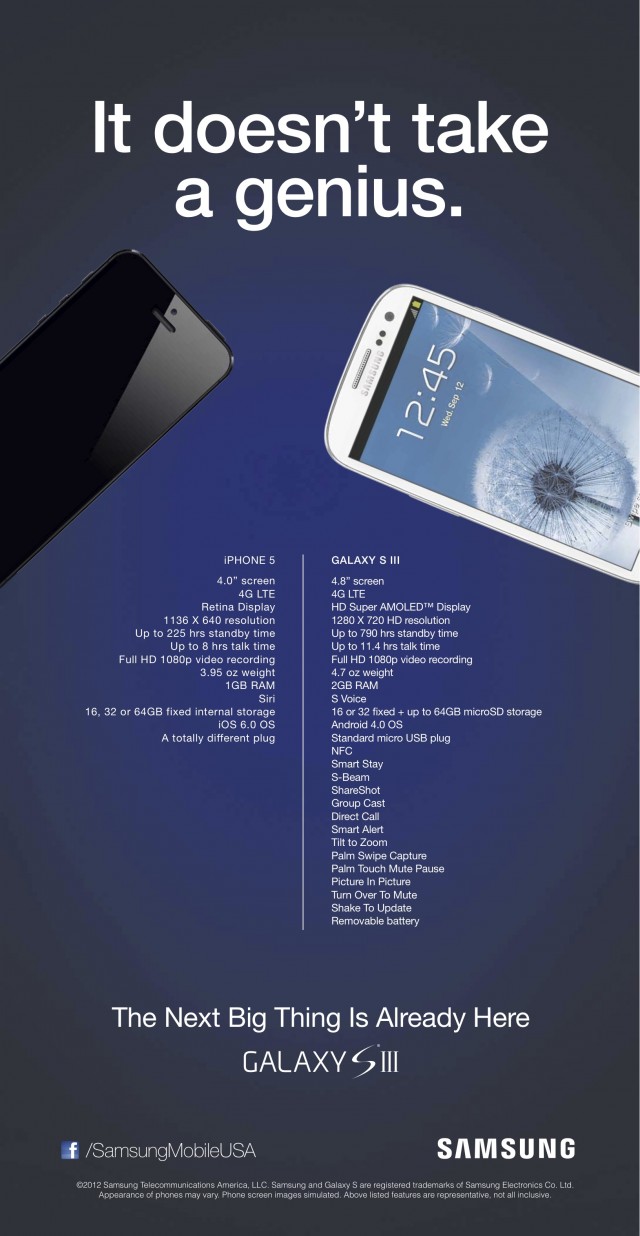
Samsung compares its Galaxy S3 with iPhone 5, says theirs is an obvious winner — doesn’t take a genius!


Samsung isn’t letting up on their ad campaign against Apple, with the latest ad for the Galaxy S3trying to make a mockery of Apple’s newly unveiled iPhone 5. Showing a spec by spec comparison of the two devices and also mentioning Samsung’ssoftware features like S Beam, Smart Stay, Direct Call, etc, Samsung wants to prove that “it doesn’t take a genius” to see which device is better.
The Galaxy S3 beats the iPhone 5 in almost every spec of course and also has a longer list of features, but what Samsung fails to understand is that iPhone fans have never been into specs that much and are more in love with the iOS ecosystem, which will again make the latest iPhone a must-have upgrade for many Apple fans. We nerds and power-users of course understand that the Galaxy S3 provides much more bang for the buck, but the ad is surely not going to turn the loyal Apple customers away (though they might turn a few).
What do you think? Are these ads a good way to get more people over to their products or is Samsung is going too out of the way with them? Do let us know in the comments!

RecoverX: Install CWM ClockworkMod Recovery on Your Xperia Device Pretty Easily


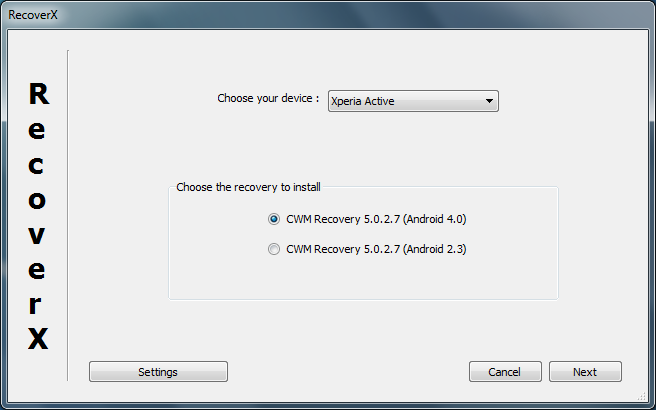
The procedure to install ClockworkModrecovery – which is a custom recovery used to install custom ROMs – on Xperia devices just got a lot easier and simpler thanks to RecoverX, a graphical user interface-based tool developed by XDA Senior Member LEDelete  that lets you install ClockworkMod recovery on almost any Xperia device with a few simple clicks of the mouse.
Using Recover X is quite simple. As long as your device is rooted and is running on a stock Gingerbread or Ice Cream Sandwich ROM, you simply need to connect it to the computer, start up RecoverX, choose the version of recovery you want to install, grant it superuser access on the phone, and RecoverX does everything else automatically. What’s even better is that you don’t need to unlock the bootloader on your phone for this (except for newer devices such as Xperia S, P, U which do need an unlocked bootloader).
RecoverX supports the following devices at this moment:
  • Xperia Active
  • Xperia Live with Walkman
  • Xperia Mini
  • Xperia Mini Pro
  • Xperia Arc
  • Xperia Arc S
  • Xperia Neo
  • Xperia Neo V
  • Xperia Play
  • Xperia Pro
  • Xperia Ray
  • Xperia X8
  • Xperia X10 Mini
  • Xperia X10 Mini Pro
  • Xperia S (beta)
  • Xperia U (beta) (unlocked bootloader)
  • Xperia P (beta) (unlocked bootloader)
  • Xperia Sola (beta) (unlocked bootloader)
RecoverX is surely a must-have tool for installing ClockworkMod recovery on Xperia devices specially because it provides support for almost every device in a single program. Head over to the official development page on XDA  for more details on RecoverX and to download and try it out. Do let us know how it works!

Free Tools to Rotate and Flip Display of your Taken Videos


Free Tools to Rotate and Flip Display of your Taken Videos
Mobiles are evolving now in the tech world and so many people want to buy smart phones. Smart phones are having capability of taking videos in HD format also. When taking videos, you must keep the proper angle of your mobile display. But always we can’t keep the right angle or keep the mobile straight to the scenery. If you were holding the mobile upside down at taking videos, you have to see that video by changing the mobile’s position. Some iPhone and iPad Users are mostly taken videos without proper angle. Let’s see how to fix wrongly taken your videos.

How to Rotate and Flip your Videos


Rotate and flip the direction of video display is the final solution for these problems. I found two free softwares in online to rotate and flip your wrongly taken videos. Both the softwares having some common functions are listed below.

• Rotate video 90 CW
• Rotate video 180 degree
• Rotate video 90 CCW
• Flip video horizontal
• Flip video vertical
• Flip video vertical and rotate 90 CW
• Flip video vertical and rotate 90 CCW.

1. X2X Free Video Flip and Rotate

Free Tools to Rotate and Flip Display of your Taken Videos


2. Free Video Flip and Rotate (DvdVideoSoft)

Free Tools to Rotate and Flip Display of your Taken Videos

How to Backup & Restore your Outlook Express Mails


Outlook Express is POP email client manager software that is used to read emails in local computer and store mails to read anytime in your system. We can configure any email service in Outlook Express like Gmail and Yahoo that supports POP system. Mails are your important data so you have to keep them safer way. Sometimes your system can be crashed or attacked by viruses. Before you make format or reinstall your system, you must backup your system and also Outlook Express Mails.

First you need to copy the mail store folder of Outlook Express for backup process. If you don’t know about that process, here is the easy way to backup all contents and mail accounts of Outlook Express. Geniesoft Outlook Express Backup is free software to backup and restore all Outlook Express mails, mail accounts, folders and contacts.
You can backup all identies of Outlook express to local system or restore entire backup to another new computer to use all previous data. You can backup to LAN, DVD, Pen drives and also FTP supported. Backup all contents to an Exe file is a pretty thing and password protect support also provided.
There are three types of backup supported are Normal Backup, Incremental Backup and Mirror Backup. When you need to restore mails, simply select the .boe file from the Backup folder that you previously saved. You can backup or restore all contents or partially

How to Protect your Dropbox Account with 2-Step Verification?

There are so many of hackers attacking sites daily. We have to protect our mail accounts and cloud based sites. Already you know about of Google’s 2-step verification process is a secure thing for using mails. Now famous cloud storage service Dropbox has also added this 2-step verification feature to all members. So you can secure your files online more effectively.


How to enable 2-Step verification to your Dropbox Account?

1. Login your Dropbox account and go to settings by clicking your name
2. Go to Security tab and you can see the 2-step verification feature disabled. Now click on Change link. Then you have to enter your Dropbox account password.

3. There are two methods available to protect your account. One is Text messages and another one is Mobile Authenticator app.


4. Select Text messages option and provide your mobile phone number. Now you will receive a 6-digit security code number to your mobile. Just enter it on the box and click next button.


5. Then you will see the backup code number to use the account when your mobile is not available. So write it down or save the number to your pc carefully.

6. Finally just click the “Enable 2-Step Verification” button and you have done.

Afterwards whenever you login to your Dropbox account with any new device, you have to enter the security code to further use.

Popular Posts